28 February 2014

Android Unit Tests


At my old gig I did unit tests....lots and lots of unit tests. At the mercy of one boisterous kiwi I got pretty good at it too, truth be told I began to really enjoy it. Unit testing (done well) gives you confidence in your code and allows you to make changes reassured that previous functionality won't break.
IMHO Any programmer worth their salt should unit test where possible.

Anyway, I've been in the Android world for some time and haven't really had the chance to start experimenting with unit testing. Thankfully Google has a really good explanation of how to set-up a unit testing environment:

http://developer.android.com/tools/testing/testing_android.html

However there's tonnes of information thrown at you there and their Eclipse example focuses on the UI. Now in my experience UI testing with automated tests is tricky. While it's fantastic if you can do it, I've found the UI changes too frequently too maintain automated tests. Business cases are naturally more concerned with the UI so it changes regularly and more often that not their are just too many factors involved. So I've written a very quick demo that focuses just on unit testing code.

The Android App To Be Tested

For the purposes of example I've created a very very simple Android app. Just run through the wizard and create a default app. I called mine myAwesomeAndroidApp. Then add the following method too the MainActivity:

public static boolean validateIsMonth(int month){
    
    if(month > 0 && month < 13){
        return true;
    }
    
    return false;
}

This is the method I want to test, simplest thing I could think of.

The Test Framework.

Eclipse ADT contains a framework for creating stand alone testing apps. This enables you to keep your tests and your deployable app separate. To start a new app goto
New -> Other -> Android Test Project


Follow the wizard through, of course ensuring you select your myAwesomeAndroidApp as the test target. You should now have two projects, the test project having an empty package.
In the empty package create a new class, call it TestValidation.java

Now paste the code in as such:

package com.example.myawesomeandroidapp.test;

import android.test.AndroidTestCase;

public class TestValidation extends AndroidTestCase {

    protected void setUp() throws Exception {
        super.setUp();
    }
    
}


Note the use of extends AndroidTestCase. This is very important and allows us to test Android projects.

Now add the unit tests, again this is a very basic example and you should make this more complicated as neccessary to suit your project and expectations.

    public void testValidation(){
        assertTrue(MainActivity.validateIsMonth(2));
    }
    
    public void testValidationFail(){
        assertFalse(MainActivity.validateIsMonth(13));
    }

You'll see we are testing our validateIsMonth method in the MainActivity, we're testing a pass case and a fail case. Again basic basic unit tests here but hopefully you get the idea.

If you right click on your project and click Run as -> Android JUnit Test your project should run and Eclipse should switch to JUnit view and show you a beautiful column of green lights indicating your unit tests have all passed :)


Hope this helps and happy testing.

Oh and jokes aside Adam Cameron has done some really awesome work on CFML unit testing, check out his blog for some great examples: http://cfmlblog.adamcameron.me/search/label/Unit%20Testing


25 January 2014

Google Cloud Messaging with Android and ColdFusion backend


Google Cloud Messaging (GCM) is an awesome little service. It enabled "push" messages to be sent from Google to a specific Android phone and picked up by your application. The scope for these messages is massive but the intent is for the content to be fairly small. A great example (and a great name) is a tickle. This is very small message intended to instruct the application to go and perform an action.

For example, say your app needs data to be kept in sync with your server. This could be done by polling, but polling is resource intensive and sucks up precious bandwidth. A far better idea would be for your server to send out a message whenever the necessary data is updated and tell your app to come and re-fetch the data when possible. The message sent to your app is called a tickle!

I've created a simple tutorial to briefly describe GCM and show an example. My example does have a lot of moving parts to it but hopefully is simple enough to get the basic idea. For my backend server I'm using a CFML server which keeps track of any device registering for messages and allows me to send a message out too that device.

The sample app uses three components:

  1. GCM Connection Server - A Google Cloud project to send the message from you to the device.
  2. Application Server - Your own personal server that tracks device ids and issues messages. This can be cfml, php aspx, whatever, but it needs the capacity to store data, preferably in a db.
  3. Your Android app - The app you write and distribute as necessary.

Step 1 - The GCM Server

OK First we need to setup our Google Cloud Messaging service. To do this we log onto Google's cloud messaging panel and configure a new project. This project will now sit and wait for instructions and when told will relay messages from our server to our elected android device.

To set this up, follow the instructions here: http://developer.android.com/google/gcm/gs.html

Step 2 - The Application Server

As mentioned for this I'm using CFML here with a mysql db. I've not spent much time on this so it doesn't look pretty but I just wanted to illustrate the point. First the db, I've used one simple table:

CREATE TABLE gcmtest{
 intID INT NOT NULL AUTO_INCREMENT PRIMARY KEY,
 strName varchar(100) not null,
 registrationid varchar(200) not null
}

That's it for db work! We have an ID column, a human readable name and a registration id which will contain the device id which is registered with Google.

Now the application server needs two files. One to respond to incoming registration requests and one to send messages, first the registration responder. Now a word of warning, this isn't production worthy, it's just a test bed. You should sanitise and protect your data much more thoroughly. As you can see it takes two values from the URL and inserts them into the db.

receive.cfm:
<cfif structKeyExists(url, "registrationid") AND structKeyExists(url, "name")>

    <cfquery name="qInsertReg" datasource="local">
        insert into gcmtest 
        (
            registrationid,
            strname
        )
        values
        (
            <cfqueryparam cfsqltype="CF_SQL_VARCHAR"    value="#url.registrationid#" />,
            <cfqueryparam cfsqltype="CF_SQL_VARCHAR"    value="#url.name#" />
        )
    </cfquery>

    <cfoutput>Done.</cfoutput>

</cfif>

Next you need the page which will send out messages, send.cfm:


<cfif structKeyExists(url, "regid")>

    <cfif structKeyExists(url, "strmsg")>
        <cfset strmymsg = url.strmsg />
    <cfelse>
        <cfset strmymsg = "all your base are belong to me" />
    </cfif>

    <cfset stFields = { "registration_ids": [ "#url.regid#" ], "data": {msg: "#strmymsg#"} }>
    
    <cfhttp url="https://android.googleapis.com/gcm/send" method="post" result="httpResp" timeout="60">
        <cfhttpparam type="header" name="Content-Type" value="application/json" />
        <cfhttpparam type="header" name="Authorization" value="key=***yourkeyfromgoogle***" />
        <cfhttpparam type="body" value="#serializeJSON(stFields)#">
    </cfhttp>
    
        
    <cfif httpResp.status_code eq 200>
        <span style="color:green;font-weight:bold;">Message Sent</span><br />
    </cfif>
</cfif>


<cfquery name="qGet" datasource="local">
    select * from gcmtest
</cfquery>

<form action="send.cfm" method="GET">
    <strong>Select Recipient:</strong>
    <br />
    
    <cfoutput query="qGet">
        <input type="radio" name="regid" value="#registrationid#">#strname#<br>
    </cfoutput>
    <br />
    
    <strong>Message:</strong><br />
    <input name="strmsg" type="text" /><br /><br />
    <input type="submit" value="submit" name="submit">
</form>

As you can see, we get everything from the gcmtest table and output it with radio buttons and a message box. When you hit send it self posts and the cfhttp takes over. For the cfhttp we use a json struct containing the registration id and the message. This we pass to the url https://android.googleapis.com/gcm/send obviously not forgetting to pass along our authorization key we created in step one.

That's it for the server side!

Step 3 - Android In Action

Now we need to have our Android app a) register with and b) receive messages from CGM. Now there is a lot of code here, so I'll post the project on gitHub but I'm hoping to cover the basics. There are obviously loads of things you can do with this message but for now I'm just going to use the basic Google demo method of posting a notification. To do this we register a WakefulBroadcastReceiver which will keep the device alive in case it hears a broadcast message. Then it will fire an intentService.

a) Manifest.xml
You need these permissions:

    <!-- GCM connects to Google Services. -->
    <uses-permission android:name="android.permission.INTERNET" />
    <uses-permission android:name="android.permission.GET_ACCOUNTS" />
    <uses-permission android:name="android.permission.WAKE_LOCK" />
    <uses-permission android:name="android.permission.ACCESS_WIFI_STATE" />
    <uses-permission android:name="android.permission.ACCESS_NETWORK_STATE" />

    <permission android:name="com.google.android.gcm.demo.app.permission.C2D_MESSAGE" android:protectionLevel="signature" />
    <uses-permission android:name="com.google.android.gcm.demo.app.permission.C2D_MESSAGE" />
    <uses-permission android:name="com.google.android.c2dm.permission.RECEIVE" />

You also need to register the services:


<receiver
      android:name=".GcmBroadcastReceiver"
      android:permission="com.google.android.c2dm.permission.SEND" >
          <intent-filter>
               <!-- Receives the actual messages. -->
               <action android:name="com.google.android.c2dm.intent.RECEIVE" />
               <category android:name="com.google.android.gcm.demo.app" />
          </intent-filter>
</receiver>
<service android:name=".GcmIntentService" />

Then what we're going to do in ActivityMain is check for the existence of a stored preference for the users name. If found we'll start a Fragment to welcome the user, if not we'll ask the user for their name.


FragmentTransaction ft = getSupportFragmentManager().beginTransaction();
String strName = getNameFromPrefs();

if(strName.length() > 0){
 Bundle bundle = new Bundle();
 bundle.putString(FragmentWelcome.TAG_NAME, strName);
 FragmentWelcome frag = new FragmentWelcome();
 frag.setArguments(bundle);
 ft.replace(R.id.activity_default_fragment_container, frag, FragmentWelcome.class.getSimpleName());
}else{
 ft.replace(R.id.activity_default_fragment_container, new FragmentName(), FragmentName.class.getSimpleName());
}

ft.commit();

Now FragmentName is really simple and I shall spare you the details. It is a simple layout with an input text box. It checks for internet and validates the input and if so it calls a listener which returns to the main activity. The Activity saves the user's name in the savedPreferences and opens FragmentWelcome.

FragmentWelcome covers the following steps:
  • Get user's name via intent
  • verify GooglePlayServices
  • Gets your GCM Sender ID (created in step 1). Store this in strings.xml or somewhere sensible.
  • Using your GCM Sender ID it posts to Google Play Services and gets your device id.
        private void registerInBackground() {
            new AsyncTask<String, Void, String>() {
                @Override
                protected String doInBackground(String... params) {
                    String msg = "";
                    String name = "";
                    try {
                        if (gcm == null) {
                            gcm = GoogleCloudMessaging.getInstance(context);
                        }
                        regid = gcm.register(SENDER_ID);
    

  • Gets the URL of the receieve.cfm file we created in step 2 (again store it in strings or prefs) and appends the user's name and the device id to the url.
  • Call an AsyncTask to open DefaultHttpClient and hit the url we have now created.
        private class UploadRegistrationID extends AsyncTask<String, Void, String> {
            @Override
            protected String doInBackground(String... urls) {
                String response = "";
                for (String url : urls) {
                    DefaultHttpClient client = new DefaultHttpClient();
                    HttpGet httpGet = new HttpGet(url);
                    try {
                        HttpResponse execute = client.execute(httpGet);
                        InputStream content = execute.getEntity().getContent();
        
                        BufferedReader buffer = new BufferedReader(new InputStreamReader(content));
                        String s = "ServerResponse:";
                        while ((s = buffer.readLine()) != null) {
                            response += s;
                        }
                    } catch (Exception e) {
                        e.printStackTrace();
                    }
                }
                return response;
            }
    

That's it. Once you've run your Android app and entered your name you should be able to go to your send.cfm file in a web browser and send a message through to your device. The message will then pop up in your notification window!

Here's the Android project on github:
https://github.com/jamessolo12/gcmPushDemo

Magic ;)


15 January 2014

Noisy Maps is dead...long live Noisy Maps!

Some time ago I started a project called Noisy Maps. The idea being an easy way to find nearby utilities like cash points, mail boxes and phone boxes. This project quickly became a labour of love and something that at times was really challenging. I've learnt a lot about linux, apache tomcat, railo and coldfusion. Not to mention some awesome sql procs for finding nearby things.

However the time has come when the project has out-grown me....plus I can't afford to keep hosting it ;)

So I've decided to open source it and launch it on github.

If you feel you can contribute or indeed host it, go for it. Good luck to you:

https://github.com/jimbo1299/noisymaps

11 January 2014

The death of noisypix.com

Some time ago I noticed every one of my (technologically challenged) parent's photos were taken at around eight million gigabytes. Backing them up was becoming a pain and taking up a huge amount of space! So I created noisypix, a simple website to upload photos and images too and be provided in return with a smaller shrunk down file which was more reasonable to maintain.

The core of the project was Coldfusion and I already knew photo manipulation was quite simple using
<cfimage>
The exciting part of the project for me was going to be some HTML 5 goodness tucked in with some bootstrap, jquery and jquery filedrop.

Sadly time has passed and I've moved on to other things. Noisypix sits on a linux box with a copy of railo making it all tick. The problem being it costs me money! Not a huge amount but some, and I'm trying to cut back. Plus by the looks of Google Analytics, hardly anyone uses it!

So I've come to the painful decision to kill my linux box and let noisypix out into the wild. I'm going to open source it, post it on github and see what the world does with it. I doubt much will happen but I hope someone one day will learn something from it.

So sometime in February I'll be pulling the plug. If you'd like to check out my code and see what you think, or perhaps even improve and host it yourself, you're most welcome too.

https://github.com/jimbo1299/noisypix

23 December 2013

Android show contact email addresses

So this is something in Android I thought would be really simple but quite frankly, wasn't. I want to get a list of all email addresses in my phone and display them in a list. If one is to use ContactsContract.CommonDataKinds.Email.CONTENT_URI without filter you basically get every email address you've ever emailed. Not ideal. I am (in this case) looking for only our saved Google contacts. We can do this query in the UI thread, which works fine but if you have several hundred contacts that'll kill the app. So we're going to use LoaderManager. First we setup out fragment:

public class FragmentMain extends Fragment implements LoaderManager.LoaderCallbacks{

 ArrayList mFriends = new ArrayList();

...
}

Now we need to setup our createLoader method to get the data and onLoadFinished to put the data into the UI. The selection here is very important as it limits the query to the visible contacts: String my_selection = ContactsContract.Contacts.IN_VISIBLE_GROUP + " = '1'";.
Next step is very simple, in the onLoadFinished we loop through the available data, adding each email address to an ArrayList.


 @Override
 public Loader onCreateLoader(int arg0, Bundle arg1) {
  //Sort by email address no case
  final String my_sort_order = ContactsContract.CommonDataKinds.Email.DATA + " COLLATE NOCASE ASC";
  String my_selection = ContactsContract.Contacts.IN_VISIBLE_GROUP + " = '1'";
  String[] eproj = new String[]{
   ContactsContract.Contacts._ID,
   ContactsContract.CommonDataKinds.Email.DATA};
  Uri uri = android.provider.ContactsContract.CommonDataKinds.Email.CONTENT_URI;
  //Query all emails in contacts
  return new CursorLoader(getActivity(), uri, eproj, my_selection, null, my_sort_order);
 }

 @Override
 public void onLoadFinished(Loader arg0, Cursor data) {
  
  if (data != null && data.moveToFirst()) {
   //Loop through cursor
   while (!data.isAfterLast()) {
    //get Email address
    String myemail = data.getString(data.getColumnIndex(ContactsContract.CommonDataKinds.Email.DATA));
    if(!mFriends.contains(myemail)){
     //Add email to arrayList
     mFriends.add(myemail);
    }
    
    data.moveToNext();
   }
  }
  //load friends into ui
  loadFriends();
 }

 @Override
 public void onLoaderReset(Loader arg0) {
  //Not Used
 }

Last but not least we load the data into our listview. Now you can of course, should you desire, create a custom Adapter and implement your own item view, but that's a blog post for another day.


 private void loadFriends(){
  //load arraylist into adapter.
  ArrayAdapter adapter = new ArrayAdapter(getActivity(), android.R.layout.simple_list_item_1, android.R.id.text1, mFriends);
  mFriendsList.setAdapter(adapter);
 }

Oh and one more thing, don't forget your permissions :)
<uses-permission android:name="android.permission.READ_CONTACTS" />

14 October 2013

Android Nav Drawer / Sliding Menu

If you've seen those side bar sliding menu's in Android you may have found them pretty useful. Facebook has used them to good affect with its left and right nav drawer menus. If you've tried to create them you'll no doubt know they're a pain. So many different versions of Android don't make it easy and the complexities of fragments make it tricky at best. However I have recently discovered a library by Jeremy Feinstein which makes it incredibly easy. So I can't claim I did much work here, but I did implement it, which (IMHO) his docs don't do brilliantly. Anyway his work is terrific, so give it a try http://jeremyfeinstein.com/

First things first, you'll need the Google Support Library. Then download Jeremy's library from github https://github.com/jfeinstein10/SlidingMenu. Get both of these librarys set up in Eclipse or Android Studio, whichever one you use. You'll need to make sure they compile with no errors. Word of advice, check the build target, ensure its the latest version of Android and the project is marked as a library.

Now create your new project and include both the libraries. Start with the easy bit and create to layout xml files. One for the sliding menu and one for the main page. The main page is whatever you want, here's my menu file though in case it helps FragmentMenu.xml:

<?xml version="1.0" encoding="utf-8"?>
<LinearLayout xmlns:android="http://schemas.android.com/apk/res/android"
    android:layout_width="match_parent"
    android:layout_height="wrap_content"
    android:orientation="vertical" >

    <TextView
        android:id="@+id/fragment_menu_btn_animal"
        style="@style/MenuButton"
        android:drawableLeft="@drawable/animal"
        android:text="@string/muppet_animal" />

    <View
        android:layout_width="match_parent"
        android:layout_height="1dp"
        android:background="@color/spacer_menu_top" />

    <View
        android:layout_width="match_parent"
        android:layout_height="1dp"
        android:background="@color/spacer_menu_bottom" />

    <TextView
        android:id="@+id/fragment_menu_btn_gonzo"
        style="@style/MenuButton"
        android:drawableLeft="@drawable/gonzo"
        android:text="@string/muppet_gonzo" />

</LinearLayout>

Next create a FragmentMenu.java file, nothing ground breaking here:
package com.example.newnavbartest;

import android.os.Bundle;
import android.support.v4.app.Fragment;
import android.view.LayoutInflater;
import android.view.View;
import android.view.View.OnClickListener;
import android.view.ViewGroup;
import android.widget.Toast;

public class FragmentMenu extends Fragment{

    @Override
    public View onCreateView(LayoutInflater inflater, ViewGroup container, Bundle savedInstanceState) {
        return inflater.inflate(R.layout.fragmentmenu, container, false);
    }
    
    @Override
    public void onActivityCreated(Bundle savedInstanceState) {
        super.onActivityCreated(savedInstanceState);
        
        getView().findViewById(R.id.fragment_menu_btn_animal)
        .setOnClickListener(new OnClickListener() { 
            public void onClick(View v) {  
                Toast.makeText(getActivity(), "Animal", Toast.LENGTH_SHORT).show();
            }
        });

        getView().findViewById(R.id.fragment_menu_btn_gonzo)
        .setOnClickListener(new OnClickListener() { 
            public void onClick(View v) {  
                Toast.makeText(getActivity(), "Gonzo", Toast.LENGTH_SHORT).show();
            }
        });
    
    }
    
}

Last and most important is the main activity file, this is where we control the sliding menu library:
package com.example.newnavbartest;

import com.jeremyfeinstein.slidingmenu.lib.SlidingMenu;

import android.os.Bundle;
import android.support.v4.app.FragmentActivity;
import android.support.v4.app.FragmentTransaction;

public class MainActivity extends FragmentActivity {

    @Override
    public void onCreate(Bundle savedInstanceState) {
        super.onCreate(savedInstanceState);
        setTitle(R.string.app_name);
        // set the content view
        setContentView(R.layout.activity_main);

        // configure the SlidingMenu
        SlidingMenu menu = new SlidingMenu(this);
        menu.setMode(SlidingMenu.LEFT);
        menu.setTouchModeAbove(SlidingMenu.TOUCHMODE_FULLSCREEN);
        menu.setShadowWidthRes(R.dimen.shadow_width);
        menu.setShadowDrawable(R.drawable.shadow);
        menu.setBehindOffsetRes(R.dimen.slidingmenu_offset);
        menu.setFadeDegree(0.35f);
        menu.attachToActivity(this, SlidingMenu.SLIDING_CONTENT);
        menu.setMenu(R.layout.activity_default);
        
        FragmentTransaction ft = getSupportFragmentManager().beginTransaction();
        ft.add(R.id.activity_default_fragment_container, new FragmentMenu(), FragmentMenu.class.getSimpleName());
        ft.commit();
    }
    
}


Hopefully this helps! Here's the github of this project: https://github.com/jimbo1299/navdrawer

15 August 2013

Android Action Bar Compat


Action Bar Compat is an Android tool released by Google at I/O 2013.
http://android-developers.blogspot.ca/2013/08/actionbarcompat-and-io-2013-app-source.html

If you add a standard action bar to your Android project, you're forced to upgrade your minimum SDK version to 3.0, (API level 11 Honeycomb). This was when Google added the action bar. However if you want to support older versions of Android in your app then you can now use Compat. This enables you to drop back to Android 2.1 Eclair (API level 7).

Figuring out Action Bar Compat is not the easiest of tasks and requires quite a few steps.


Setup Support Library
http://developer.android.com/tools/support-library/setup.html

Action Bar Compat runs off a separate library that you need to install in your eclipse / studio workspace. Follow the steps in the above link carefully. You'll want to use the drop down "Adding libraries with resources" and follow those instructions. Once you're done you should have a new project named android-support-v7-appcompat in the workspace with no errors.
I had to modify my project.properties file to use the latest sdk:
target=android-18

Your Project

Now you can obviously create a new project or use an existing one. You'll want to make sure you right click on your project, click properties, click Android and then verify / change the following things:

  • You need to add the android-support-v7-appcompat project as a library.
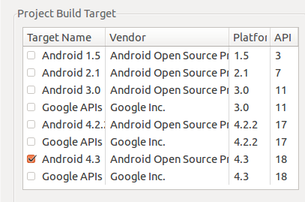
  • You need to make sure the project build target is the same for your project as it is for android-support-v7-appcompat. This is currently Android 4.3.


Now you can start changing the contents of the project. First the res/menu/menu.xml file has a couple of small changes:

  • The XML namespace becomes:
    <menu xmlns:android="http://schemas.android.com/apk/res/android"
        xmlns:support="http://schemas.android.com/apk/res-auto" >
  • The item attribute android:showAsAction="ifRoom|withText" becomes support:showAsAction="ifRoom"
Next the Manifest.xml.

  • Change the application theme, from this:
    • android:theme="@style/AppTheme"
             to
    • android:theme="@style/Theme.AppCompat"
Now open up your MainActivity.java file and we need to change a few things in here:

  • Change the extends to use ActionBarActivity
    • public class ... extends Activity
            becomes
    • public class ... extends ActionBarActivity
  • Replace any onCreateOptionsMenu you may have with a new one:
    @Override
    public boolean onCreateOptionsMenu(Menu menu) {
        // Inflate our menu from the resources by using the menu inflater.
        getMenuInflater().inflate(R.menu.main, menu);

        return true;
    } 
  • The onOptionsItemSelected should be the same.
  • You'll also need to import the following class:
         import android.support.v7.app.ActionBarActivity;
    But head Google's warning:


Caution: Be certain you import the ActionBar class (and related APIs) from the appropriate package:
  • If supporting API levels lower than 11:
    import android.support.v7.app.ActionBar
  • If supporting only API level 11 and higher:
    import android.app.ActionBar

That's about it, you should be ready to cook.

This is Android 2.1 (API Level 7) Without Action Bar Compat:


This is Android 2.1 (API Level 7) with Action Bar Compat:


Easy as that!
Here's my git repo for this example: https://github.com/jamessolo12/actionbarcompat You can find Google's sample here: /sdk/samples/android-18/ui/actionbarcompat/Basic