Action Bar Compat is an Android tool released by Google at I/O 2013.
http://android-developers.blogspot.ca/2013/08/actionbarcompat-and-io-2013-app-source.html
If you add a standard action bar to your Android project, you're forced to upgrade your minimum SDK version to 3.0, (API level 11 Honeycomb). This was when Google added the action bar. However if you want to support older versions of Android in your app then you can now use Compat. This enables you to drop back to Android 2.1 Eclair (API level 7).
Figuring out Action Bar Compat is not the easiest of tasks and requires quite a few steps.
Setup Support Library
http://developer.android.com/tools/support-library/setup.html
Action Bar Compat runs off a separate library that you need to install in your eclipse / studio workspace. Follow the steps in the above link carefully. You'll want to use the drop down "Adding libraries with resources" and follow those instructions. Once you're done you should have a new project named android-support-v7-appcompat in the workspace with no errors.
I had to modify my project.properties file to use the latest sdk:
target=android-18
Your Project
Now you can obviously create a new project or use an existing one. You'll want to make sure you right click on your project, click properties, click Android and then verify / change the following things:
- You need to add the android-support-v7-appcompat project as a library.
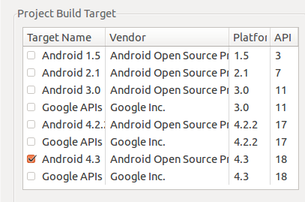
- You need to make sure the project build target is the same for your project as it is for android-support-v7-appcompat. This is currently Android 4.3.

Now you can start changing the contents of the project. First the res/menu/menu.xml file has a couple of small changes:
- The XML namespace becomes:
<menu xmlns:android="http://schemas.android.com/apk/res/android"
    xmlns:support="http://schemas.android.com/apk/res-auto" >
- The item attribute android:showAsAction="ifRoom|withText" becomes support:showAsAction="ifRoom"
- Change the application theme, from this:
- android:theme="@style/AppTheme"
to - android:theme="@style/Theme.AppCompat"
- Change the extends to use ActionBarActivity
- public class ... extends Activity
becomes - public class ... extends ActionBarActivity
- Replace any onCreateOptionsMenu you may have with a new one:
    @Override
    public boolean onCreateOptionsMenu(Menu menu) {
        // Inflate our menu from the resources by using the menu inflater.
        getMenuInflater().inflate(R.menu.main, menu);

        return true;
    }
- The onOptionsItemSelected should be the same.
- You'll also need to import the following class:
import android.support.v7.app.ActionBarActivity;
But head Google's warning:
Caution: Be certain you import
the
ActionBar class (and related APIs) from the appropriate package:- If supporting API levels lower than 11:
import android.support.v7.app.ActionBar - If supporting only API level 11 and higher:
import android.app.ActionBar
That's about it, you should be ready to cook.
This is Android 2.1 (API Level 7) Without Action Bar Compat:
This is Android 2.1 (API Level 7) with Action Bar Compat:
Easy as that!
Here's my git repo for this example: https://github.com/jamessolo12/actionbarcompat You can find Google's sample here: /sdk/samples/android-18/ui/actionbarcompat/Basic


1 comment:
Post a Comment