14 October 2013

Android Nav Drawer / Sliding Menu

If you've seen those side bar sliding menu's in Android you may have found them pretty useful. Facebook has used them to good affect with its left and right nav drawer menus. If you've tried to create them you'll no doubt know they're a pain. So many different versions of Android don't make it easy and the complexities of fragments make it tricky at best. However I have recently discovered a library by Jeremy Feinstein which makes it incredibly easy. So I can't claim I did much work here, but I did implement it, which (IMHO) his docs don't do brilliantly. Anyway his work is terrific, so give it a try http://jeremyfeinstein.com/

First things first, you'll need the Google Support Library. Then download Jeremy's library from github https://github.com/jfeinstein10/SlidingMenu. Get both of these librarys set up in Eclipse or Android Studio, whichever one you use. You'll need to make sure they compile with no errors. Word of advice, check the build target, ensure its the latest version of Android and the project is marked as a library.

Now create your new project and include both the libraries. Start with the easy bit and create to layout xml files. One for the sliding menu and one for the main page. The main page is whatever you want, here's my menu file though in case it helps FragmentMenu.xml:

<?xml version="1.0" encoding="utf-8"?>
<LinearLayout xmlns:android="http://schemas.android.com/apk/res/android"
    android:layout_width="match_parent"
    android:layout_height="wrap_content"
    android:orientation="vertical" >

    <TextView
        android:id="@+id/fragment_menu_btn_animal"
        style="@style/MenuButton"
        android:drawableLeft="@drawable/animal"
        android:text="@string/muppet_animal" />

    <View
        android:layout_width="match_parent"
        android:layout_height="1dp"
        android:background="@color/spacer_menu_top" />

    <View
        android:layout_width="match_parent"
        android:layout_height="1dp"
        android:background="@color/spacer_menu_bottom" />

    <TextView
        android:id="@+id/fragment_menu_btn_gonzo"
        style="@style/MenuButton"
        android:drawableLeft="@drawable/gonzo"
        android:text="@string/muppet_gonzo" />

</LinearLayout>

Next create a FragmentMenu.java file, nothing ground breaking here:
package com.example.newnavbartest;

import android.os.Bundle;
import android.support.v4.app.Fragment;
import android.view.LayoutInflater;
import android.view.View;
import android.view.View.OnClickListener;
import android.view.ViewGroup;
import android.widget.Toast;

public class FragmentMenu extends Fragment{

    @Override
    public View onCreateView(LayoutInflater inflater, ViewGroup container, Bundle savedInstanceState) {
        return inflater.inflate(R.layout.fragmentmenu, container, false);
    }
    
    @Override
    public void onActivityCreated(Bundle savedInstanceState) {
        super.onActivityCreated(savedInstanceState);
        
        getView().findViewById(R.id.fragment_menu_btn_animal)
        .setOnClickListener(new OnClickListener() { 
            public void onClick(View v) {  
                Toast.makeText(getActivity(), "Animal", Toast.LENGTH_SHORT).show();
            }
        });

        getView().findViewById(R.id.fragment_menu_btn_gonzo)
        .setOnClickListener(new OnClickListener() { 
            public void onClick(View v) {  
                Toast.makeText(getActivity(), "Gonzo", Toast.LENGTH_SHORT).show();
            }
        });
    
    }
    
}

Last and most important is the main activity file, this is where we control the sliding menu library:
package com.example.newnavbartest;

import com.jeremyfeinstein.slidingmenu.lib.SlidingMenu;

import android.os.Bundle;
import android.support.v4.app.FragmentActivity;
import android.support.v4.app.FragmentTransaction;

public class MainActivity extends FragmentActivity {

    @Override
    public void onCreate(Bundle savedInstanceState) {
        super.onCreate(savedInstanceState);
        setTitle(R.string.app_name);
        // set the content view
        setContentView(R.layout.activity_main);

        // configure the SlidingMenu
        SlidingMenu menu = new SlidingMenu(this);
        menu.setMode(SlidingMenu.LEFT);
        menu.setTouchModeAbove(SlidingMenu.TOUCHMODE_FULLSCREEN);
        menu.setShadowWidthRes(R.dimen.shadow_width);
        menu.setShadowDrawable(R.drawable.shadow);
        menu.setBehindOffsetRes(R.dimen.slidingmenu_offset);
        menu.setFadeDegree(0.35f);
        menu.attachToActivity(this, SlidingMenu.SLIDING_CONTENT);
        menu.setMenu(R.layout.activity_default);
        
        FragmentTransaction ft = getSupportFragmentManager().beginTransaction();
        ft.add(R.id.activity_default_fragment_container, new FragmentMenu(), FragmentMenu.class.getSimpleName());
        ft.commit();
    }
    
}


Hopefully this helps! Here's the github of this project: https://github.com/jimbo1299/navdrawer

15 August 2013

Android Action Bar Compat


Action Bar Compat is an Android tool released by Google at I/O 2013.
http://android-developers.blogspot.ca/2013/08/actionbarcompat-and-io-2013-app-source.html

If you add a standard action bar to your Android project, you're forced to upgrade your minimum SDK version to 3.0, (API level 11 Honeycomb). This was when Google added the action bar. However if you want to support older versions of Android in your app then you can now use Compat. This enables you to drop back to Android 2.1 Eclair (API level 7).

Figuring out Action Bar Compat is not the easiest of tasks and requires quite a few steps.


Setup Support Library
http://developer.android.com/tools/support-library/setup.html

Action Bar Compat runs off a separate library that you need to install in your eclipse / studio workspace. Follow the steps in the above link carefully. You'll want to use the drop down "Adding libraries with resources" and follow those instructions. Once you're done you should have a new project named android-support-v7-appcompat in the workspace with no errors.
I had to modify my project.properties file to use the latest sdk:
target=android-18

Your Project

Now you can obviously create a new project or use an existing one. You'll want to make sure you right click on your project, click properties, click Android and then verify / change the following things:

  • You need to add the android-support-v7-appcompat project as a library.
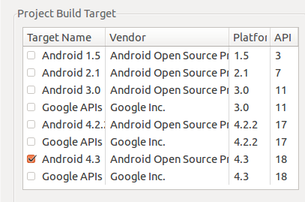
  • You need to make sure the project build target is the same for your project as it is for android-support-v7-appcompat. This is currently Android 4.3.


Now you can start changing the contents of the project. First the res/menu/menu.xml file has a couple of small changes:

  • The XML namespace becomes:
    <menu xmlns:android="http://schemas.android.com/apk/res/android"
        xmlns:support="http://schemas.android.com/apk/res-auto" >
  • The item attribute android:showAsAction="ifRoom|withText" becomes support:showAsAction="ifRoom"
Next the Manifest.xml.

  • Change the application theme, from this:
    • android:theme="@style/AppTheme"
             to
    • android:theme="@style/Theme.AppCompat"
Now open up your MainActivity.java file and we need to change a few things in here:

  • Change the extends to use ActionBarActivity
    • public class ... extends Activity
            becomes
    • public class ... extends ActionBarActivity
  • Replace any onCreateOptionsMenu you may have with a new one:
    @Override
    public boolean onCreateOptionsMenu(Menu menu) {
        // Inflate our menu from the resources by using the menu inflater.
        getMenuInflater().inflate(R.menu.main, menu);

        return true;
    } 
  • The onOptionsItemSelected should be the same.
  • You'll also need to import the following class:
         import android.support.v7.app.ActionBarActivity;
    But head Google's warning:


Caution: Be certain you import the ActionBar class (and related APIs) from the appropriate package:
  • If supporting API levels lower than 11:
    import android.support.v7.app.ActionBar
  • If supporting only API level 11 and higher:
    import android.app.ActionBar

That's about it, you should be ready to cook.

This is Android 2.1 (API Level 7) Without Action Bar Compat:


This is Android 2.1 (API Level 7) with Action Bar Compat:


Easy as that!
Here's my git repo for this example: https://github.com/jamessolo12/actionbarcompat You can find Google's sample here: /sdk/samples/android-18/ui/actionbarcompat/Basic

08 August 2013

Android, extending listView functinality


Android listViews are pretty useful and pretty simple. You have to get your head around some sort of adapter, but that's no huge issue.

However I've previously never bothered to find out how to get more than one column on a listView. Luckily this is much easier than I first thought. My example uses contentProvidors to setup the cursor, but I think this should work with DB stuff as well. Given a bit of hocus pocus.

I'm not going to go into the contentProvidor stuff here as it's a big subject and developer.android do a pretty good job:
http://developer.android.com/guide/topics/providers/content-provider-basics.html

First setup your activity_main.xml layout file:

<RelativeLayout xmlns:android="http://schemas.android.com/apk/res/android"
 xmlns:tools="http://schemas.android.com/tools"
 android:layout_width="match_parent"
 android:layout_height="match_parent">
 
 <ListView
  android:id="@+id/listView1"
  android:layout_width="wrap_content"
  android:layout_height="350dp"
  android:layout_alignParentBottom="true"
  android:layout_centerHorizontal="true" >
 </ListView>

</RelativeLayout>


Next add a new xml file to the res/layout folder (mine is named contacts_single.xml):

<?xml version="1.0" encoding="utf-8"?>
<LinearLayout xmlns:android="http://schemas.android.com/apk/res/android"
 android:layout_width="match_parent"
 android:layout_height="match_parent"
 android:orientation="horizontal" >

 <TextView
  android:id="@+id/name_entry"
  android:layout_width="100dp"
  android:layout_height="wrap_content" />
 
 <TextView
  android:id="@+id/number_entry"
  android:layout_width="100dp"
  android:layout_height="wrap_content" />

</LinearLayout>


Now move to the MainActivity or wherever your display function will be and you'll need something like this:

private void outputCursor(){
 // Defines a list of columns which we have defined in our cursor, and will be output to listView
 String[] mWordListColumns =
 {
  ContactsContract.Contacts._ID,
  ContactsContract.Contacts.DISPLAY_NAME_PRIMARY
  
 };

 // Defines a list of View IDs. These are IDs of textViews defined in a serperate layout file
 int[] mWordListItems = { R.id.name_entry, R.id.number_entry};

 // Creates a new SimpleCursorAdapter
 SimpleCursorAdapter mCursorAdapter = new SimpleCursorAdapter(
  getApplicationContext(),   // The application's Context object
  R.layout.contacts_single,   // A layout in XML for one row in the ListView
  mCursor,     // The result from the query
  mWordListColumns,    // A string array of column names in the cursor
  mWordListItems,     // An integer array of view IDs in the row layout
  0      // Flags (usually none are needed)
 );

 // Sets the adapter for the ListView
 ListView myListView = (ListView) findViewById(R.id.listView1);
 myListView.setAdapter(mCursorAdapter);
}

That should be all you need. Note the mWordListItems is passed into the adapter and the R.layout.contacts_single reference, telling the adapter to use these custom elements to display its contents. Then we get the ListView from the original activity and set the adapter. Simples!

06 August 2013

Android databse SqlLite and SQL Injection

SQL Injection is one of my favourite topics, sad but true. I think SQL injection is a very clever way of deceiving apps. This then encourages developers to be equally clever and thorough in their jobs to protect their data. I'm not for a moment endorsing such practices, what I'm saying is good developers should be aware of the possibilities.

In my last blog article I wrote a very brief introduction to SqlLite in Android.
http://webdeveloperpadawan.blogspot.ca/2013/07/android-app-using-database-sqllite.html

In this I deliberately left in some weak code so I could write a follow up on SQL injection. Look carefully at this string:

String DATABASE_ADD_USER  = "insert into "  + TABLE_NAME + " (muppetname) values (";

Obviously very susceptible to injection. If a user wrote

'; drop table theusers; --

We'd have a problem. Now fortunately database.execSQL() doesn't allow us to run more than one sql command in one execution. From developer.android.com:
Execute a single SQL statement that is NOT a SELECT or any other SQL statement that returns data.
In some ways this limits the potential of SQL injection, but we don't want to rely on that and it is horribly bad practice. Lets try it on our app and see what happens, paste the above (drop table statement) into the pop-up that appears when you click the btnFuzzy. You'll see your app crash and a SQLException in logCat.

In coldFusion we have a very useful tag called cfqueryparam: http://livedocs.adobe.com/coldfusion/8/htmldocs/help.html?content=Tags_p-q_18.html This simple tag gives us basic protection from injection and even allows us to specify the datatype. Although we should always clean our user input anyway :) Android has something very similar, allowing us to insert data using database.insert.

All we have to do is slightly ammend our insert user function:

 public void addNewUserProperly(SQLiteDatabase database, String name){
     ContentValues values = new ContentValues();
     values.put("muppetname", name);
     database.insert(TABLE_NAME, null, values);
 }

Now you'll see we've hardly changed anything, we use contentValues to store a set of values, the column name and the value. Then we insert that with database.insert. Super simple. If we re-run this and try our SQL injection trick, no more critical error :)

Hope this is of some use.

31 July 2013

Asus Zenbook with Ubuntu - part 2


Last time I blogged about this, I'd managed to dual boot Windows 8 and Ubuntu. Both were running off the large capacity HDD on my zenbook, Windows was using the 24Gb SSD as a cache drive. Ubuntu wasn't using it at all, and I noticed this in boot speeds. After a few weeks of this I hadn't booted into Windows 8 once so I decided to make the leap of faith and re-install Ubuntu over top of everything. Death to Windows 8!

I used the same method as before, go into UEFI, plug in the Ubuntu install key, change nothing and save and exit. Then immediately hold escape. This gave me the option to boot from USB and of course select install Ubuntu.

Ubuntu install started and I had to pick my language, wifi and a few other normal things. Then came the selection screen for where to install Ubuntu, this is the step I was more interested in. Ubuntu offered the choice to erase everything, or dual boot, etc etc. I was after "something else" down at the bottom. Basically the advanced setup. This allows you to customize where each piece of Ubuntu is installed, what extra partitions are setup and how.

This was quite advanced, a little tricky and quite a bit of background reading was required. This is a page I leaned heavily on for some advice:

http://askubuntu.com/questions/234111/how-to-boot-ubuntu-from-ssd-drive-which-cannot-be-selected-as-boot-device

I basically decided to install the OS on the SSD and install other crucial parts on the HDD. My reasoning being from what I've read and experienced, the SSD isn't bootable (which is lame). However booting off the HDD and then utilising the SSD for important file system reads works just as well.

To cut a long story short, after a considerable amount of time experimenting with partitions, I've now settled on, and have working the following partitions:

  • SSD - filesystem. Whole thing set up as /
  • HDD
    • 10Mb - BIOS Boot
    • 250Mb - EFI Boot
    • 200Mb - /Boot
    • 3Gb /Linux Swap file
    • Free space
That's about it, I had to repeat the method I did last time of finishing the install, then booting off the USB again, going into try Ubuntu and running boot repair. However that was easy this time and after that it all seemed to work!

Hope it's of some use.


29 July 2013

Android app using database sqlLite

I created a cute little test app today to try out a few database concepts on Android. Thankfully it's really easy and there are some great tutorials out there. Anyway some of the concepts are really useful so I thought I'd jot down my findings.

First I created my new Android project ignore the MainActivity for now. I create a pretty standard Muppet.java class. I shan't patronise you with the code, int ID, String name and getters and setters for each. Then I create a new class called MySqlLiteHelper.java this is what will do the db interaction for us.

MySqlLiteHelper.java:
import java.util.ArrayList;
import java.util.List;

import android.content.Context;
import android.database.Cursor;
import android.database.sqlite.SQLiteDatabase;
import android.database.sqlite.SQLiteOpenHelper;
import android.util.Log;

public class MySqlLiteHelper extends SQLiteOpenHelper {

 private static final String DATABASE_NAME  = "muppets.db";
 private static final int DATABASE_VERSION = 1;
 private static final String TABLE_NAME  = "theusers";

 // Database creation sql statement
 private static final String DATABASE_CREATE  = "create table " + TABLE_NAME + " (userid integer primary key autoincrement, muppetname text not null);";
 // DO NOT DO THIS IN YOUR CODE:
 private static final String DATABASE_ADD_USER  = "insert into "  + TABLE_NAME + " (muppetname) values (";
  
 
 public MySqlLiteHelper(Context context) {
  super(context, DATABASE_NAME, null, DATABASE_VERSION);
 }


 @Override
 public void onCreate(SQLiteDatabase database) {
  database.execSQL(DATABASE_CREATE);
 }
 

 @Override
 public void onUpgrade(SQLiteDatabase db, int oldVersion, int newVersion) {
  Log.w(MySqlLiteHelper.class.getName(), "Upgrading database from version " + oldVersion + " to " + newVersion + ", which will destroy all old data");
  db.execSQL("DROP TABLE IF EXISTS " + TABLE_NAME);
  onCreate(db);
 }
 
 
 public void addNewuser(SQLiteDatabase database, String name){
  // DO NOT DO INSERTS LIKE THIS IN YOUR CODE. FIND OUT WHY I THE NEXT ARTICLE.
  String insertString = DATABASE_ADD_USER + "'" + name + "');";
  database.execSQL(insertString);
 }
 
 
 public List getAllUsers(SQLiteDatabase database){
  List muppets = new ArrayList();
  String[] columns = {"userid","muppetname"};

  Cursor cursor = database.query(TABLE_NAME, columns, null, null, null, null, null);

  cursor.moveToLast();
  while (!cursor.isBeforeFirst()) {
   Muppet muppet = cursorToMuppet(cursor);
   muppets.add(muppet);
   cursor.moveToPrevious();
  }
  // Make sure to close the cursor
  cursor.close();
  return muppets;
 }
 
 
 private Muppet cursorToMuppet(Cursor cursor) {
  Muppet muppet = new Muppet();
  muppet.setMuppetId(cursor.getInt(0));
  muppet.setMuppetName(cursor.getString(1));
  return muppet;
 }
 
} 
  • MySqlLiteHelper - This function is the constructor, on initialization it will create the DB.
  • onCreate - This function created the database table by executing the static string at the top.
  • onUpgrade - I think this function is pretty clever, if you change the db version number, it'll self upgrade! Amazeballs!
  • addNewuser - This is an ugly way to insert a user, I'll change this later.
  • getAllUsers - Here we're creating a cursor and querying the db for all the users. Then we're reversing through the cursor and putting the user object into a list. I opted to reverse the list so new Muppets show up at the top. Although it's quite easy to traverse it normally and have new users at the bottom.
One quick thing that's important to mention is we're using a function in Muppet.java to force the fragment to show the muppet name, instead of the object id.

@Override
public String toString() {
 return name;
}


Our next step is to create the layout file. As an additional step I've included a fragment. This lets us compartmentalise our layout neatly. If you want to just dump a listView on the layout, you could also do that quite easily.
 <Button
  android:id="@+id/btnKermit"
  android:layout_width="wrap_content"
  android:layout_height="wrap_content"
  android:layout_alignParentLeft="true"
  android:text="Insert Kermit" />

 <Button
  android:id="@+id/btnFuzzy"
  android:layout_width="wrap_content"
  android:layout_height="wrap_content"
  android:layout_alignParentRight="true"
  android:text="Insert Fuzzy" />

 <Button
  android:id="@+id/btnRefresh"
  android:layout_width="wrap_content"
  android:layout_height="wrap_content"
  android:layout_below="@+id/btnKermit"
  android:layout_centerHorizontal="true"
  android:layout_marginTop="19dp"
  android:text="Refresh" />
 
 <fragment
  android:id="@+id/fragment1"
  android:name="com.example.testdata.ShowFragment"
  android:layout_width="wrap_content"
  android:layout_height="wrap_content"
  android:layout_alignParentBottom="true"
  android:layout_below="@+id/btnRefresh"
  android:layout_centerHorizontal="true" />
Notice that this fragment is pointing directly to our ShowFragment.java class which we'll create now:
import java.util.List;

import android.database.sqlite.SQLiteDatabase;
import android.os.Bundle;
import android.view.View;
import android.widget.ArrayAdapter;
import android.widget.ListView;
import android.app.ListFragment;

public class ShowFragment extends ListFragment {

 private SQLiteDatabase database;
 private MySqlLiteHelper dbHelper;
 
 @Override
 public void onActivityCreated(Bundle savedInstanceState) {
  super.onActivityCreated(savedInstanceState);
  
  dbHelper = new MySqlLiteHelper(getActivity());
  database = dbHelper.getWritableDatabase();
  
  showAll();
 }
 
 public void showAll(){
  List values   = dbHelper.getAllUsers(database);
  final ArrayAdapter adapter = new ArrayAdapter(getActivity(), android.R.layout.simple_list_item_1, values);
  
  setListAdapter(adapter);
 }

 @Override
 public void onListItemClick(ListView l, View v, int position, long id) {
  // Do something with the data
 }
}
This should be pretty straightforward. OnActivityCreated we get the database instance, then call showAll. showAll() calls getAllUsers and puts the results in a List. This List is then converted to an adapter and we use setListAdapter to show the results in the fragment.

Bingo!
The main activity doesn't do anything special, it has a couple of buttons for adding new muppets, basic listeners which call
dbHelper.addNewuser(database, "Kermit");

Oh and there's a refresh button which updates the fragment:
 public void refresh(){
  //get fragment to refresh
  ShowFragment viewer = (ShowFragment) getFragmentManager().findFragmentById(R.id.fragment1);
     viewer.showAll();
 }

You're done! Super easy, hope it helps.


24 July 2013

Google Play Game Services


I've previously created my own custom built high scores add on for my Android app, frankly it was pretty rubbish. It was local only, not very pretty and had no public competition element. There are a few third party apps but they cost money. That is until at Google IO Google announced Google Play Game Services. I thought I'd take a look and I was incredibly impressed.

http://developer.android.com/google/play-services/games.html

Game Services allows you to instantly integrate a leaderboard into your app. It does this using Google + which means your users can share their scores with their circles, specific friends or of course with the public. I love this because just thinking about creating a user id for every user and a server side backend to deal with all that makes me shudder. Plus you can add in achievements which is pretty cool too.

So if you want to get started adding play services I very much recommend downloading Google's sample app "Type-a-Number":

https://developers.google.com/games/services/android/quickstart

Then run through the steps to get the API set-up on Google's developer console and of course provides a sample app and code to study. I really recommend you study this and get a good grasp on how it all works. I'm not going to run through all the code here, as Google have already done that. The same applies to the API, you do need to do a bit of setup on Google's developer console. Just make sure you copy the IDs of your game service and your leaderboard into your android project. Preferably in the same way Google suggest with an ids.xml file.

You're going to need to set-up eclipse and your project with Google Play Services Library which I already had for Google Maps anyway. The sample app uses the Base Game Utils library, which isn't totally necessary, but it does make things a little simpler. Again, all steps are covered in the quickstart.

The first thing is to get the Google Plus button working. This is a simple case of adding in the com.google.android.gms.common.SignInButton button to your layout file.
Then add a listener:

//Listener for Sign in
findViewById(R.id.sign_in_button).setOnClickListener(new View.OnClickListener() {
    public void onClick(View v) {
        beginUserInitiatedSignIn();
    }
});

Now beginUserInitiatedSignIn() is a function in Base Game Utils which deals with the Google + magic. It does have a callback function though which you can utilise, here's mine:

@Override
public void onSignInSucceeded() {
    Toast.makeText(this, "Signed in", Toast.LENGTH_SHORT).show();
    
    mShowSignIn = false;
    updateUi();

}

UpdateUi() handles hiding the sign in button and showing the sign out button.

Last but not least we need to push our scores.

getGamesClient().submitScore(getString(R.string.leaderboard_highscores),intScore);

It's spectacularly easy to do.

There are however a few things I've learnt:
  1. Be very wary of your certificate. You'll need to make sure the SHA1 hash you use is the same you export your Android project as the one you enter on the game services API.
  2. When you come to release this, if you've been using your debug certificate you'll need to delete your game services on the API and start it all over again. I've tried many times to tweak the SHA1 in an active game service but it always breaks. So best to start fresh with a production ready certificate and use it for the API as well.
  3. The IDs you get from play services must be copied exactly to your ids.xml file and your manifest must have a line like this:
    <meta-data android:name="com.google.android.gms.games.APP_ID" android:value="@string/app_id" />

  4. If you want to delete your scores or change the IDs you use for the game services or leaderboard you need to goto:
    Settings -> Google -> Google + -> Apps With Google + Sign In -> xx_AppName_xx -> Disconnect App
    You'll get the option here to delete your scores. This can be a bit temperamental, so change IDs only if you're really stuck.

One last thing worth mentioning, and its addressed to Google, whom I'm sure study my blog every day! When one looks at the achievements board, you can't expand the achievement to get the full description of what is required. On a phone, this means you'll never know what's required.

Thanks and good luck.